How to Use macOS Shortcuts to Switch Between Projects Faster
Build macOS Shortcuts that open each project’s files and apps, hide distractions, and make it easier to finish one workflow before starting another.
If you work on several projects, you probably repeat the same setup each time you switch: open a folder, launch an editor, find a browser tab, and close or hide whatever is in the way. A macOS Shortcut can put those steps in one workflow.
This guide starts with two practical shortcuts: one to open a project, and one to wrap up before moving to another. Then we’ll add a timer and Focus mode, so a shortcut can help shape the work session as well as open the right apps. Action names and availability can vary with your macOS version and installed apps.
Create a shortcut for one project
Start with one folder and one app. Once that pair works, you can add the rest of your project’s setup.
- Open Shortcuts, click the plus button, and name the shortcut Open — Website.
- Search the action list for File and add it. Click its file field to open the chooser, navigate to your project folder, select the folder itself, and confirm the selection. You can choose a workspace file instead, such as a
.code-workspaceor.xcodeprojfile, if that is how you open your project. - Add Open File directly below File. Its input should be the File output from the action above. If it isn’t, Control-click the input parameter, choose Select Variable, then click the output token beneath your File action. This passes the selected folder or workspace into Open File. Apple’s guide to variables explains how to select action outputs.
- In Open File, choose the app that should open the folder or workspace. Expand the action’s options if needed and turn off Show Open In Menu, so it uses that app without asking you to choose on every run.
- Click the play button in the editor. Expected result: the selected app opens the folder or workspace you chose, without an app-selection menu. In the editor, you should see the selected path in File and Open File in [your app] below it, with File shown as the input token. Confirm the project that opened is the one you intended before adding more actions.
- Repeat the File → Open File pair for other project files. Add Open App for tools that only need launching, then Hide App for specific apps you want out of view. Run the complete shortcut again to check the result.
Shortcuts runs actions from top to bottom. Put the files and apps you need first, then any hide actions at the end. Once the setup works, assign a keyboard shortcut in its details if you want a key command.
Example: open the Rise project
The screenshot below shows that pattern in a shortcut named Rise. It passes the Rise folder to ChatGPT, opens Rise.xcodeproj in Xcode, and passes a workspace file to Cursor. Then it opens Terminal, hides ChatGPT, Xcode, and Terminal, and turns on the Work Focus until it is turned off.
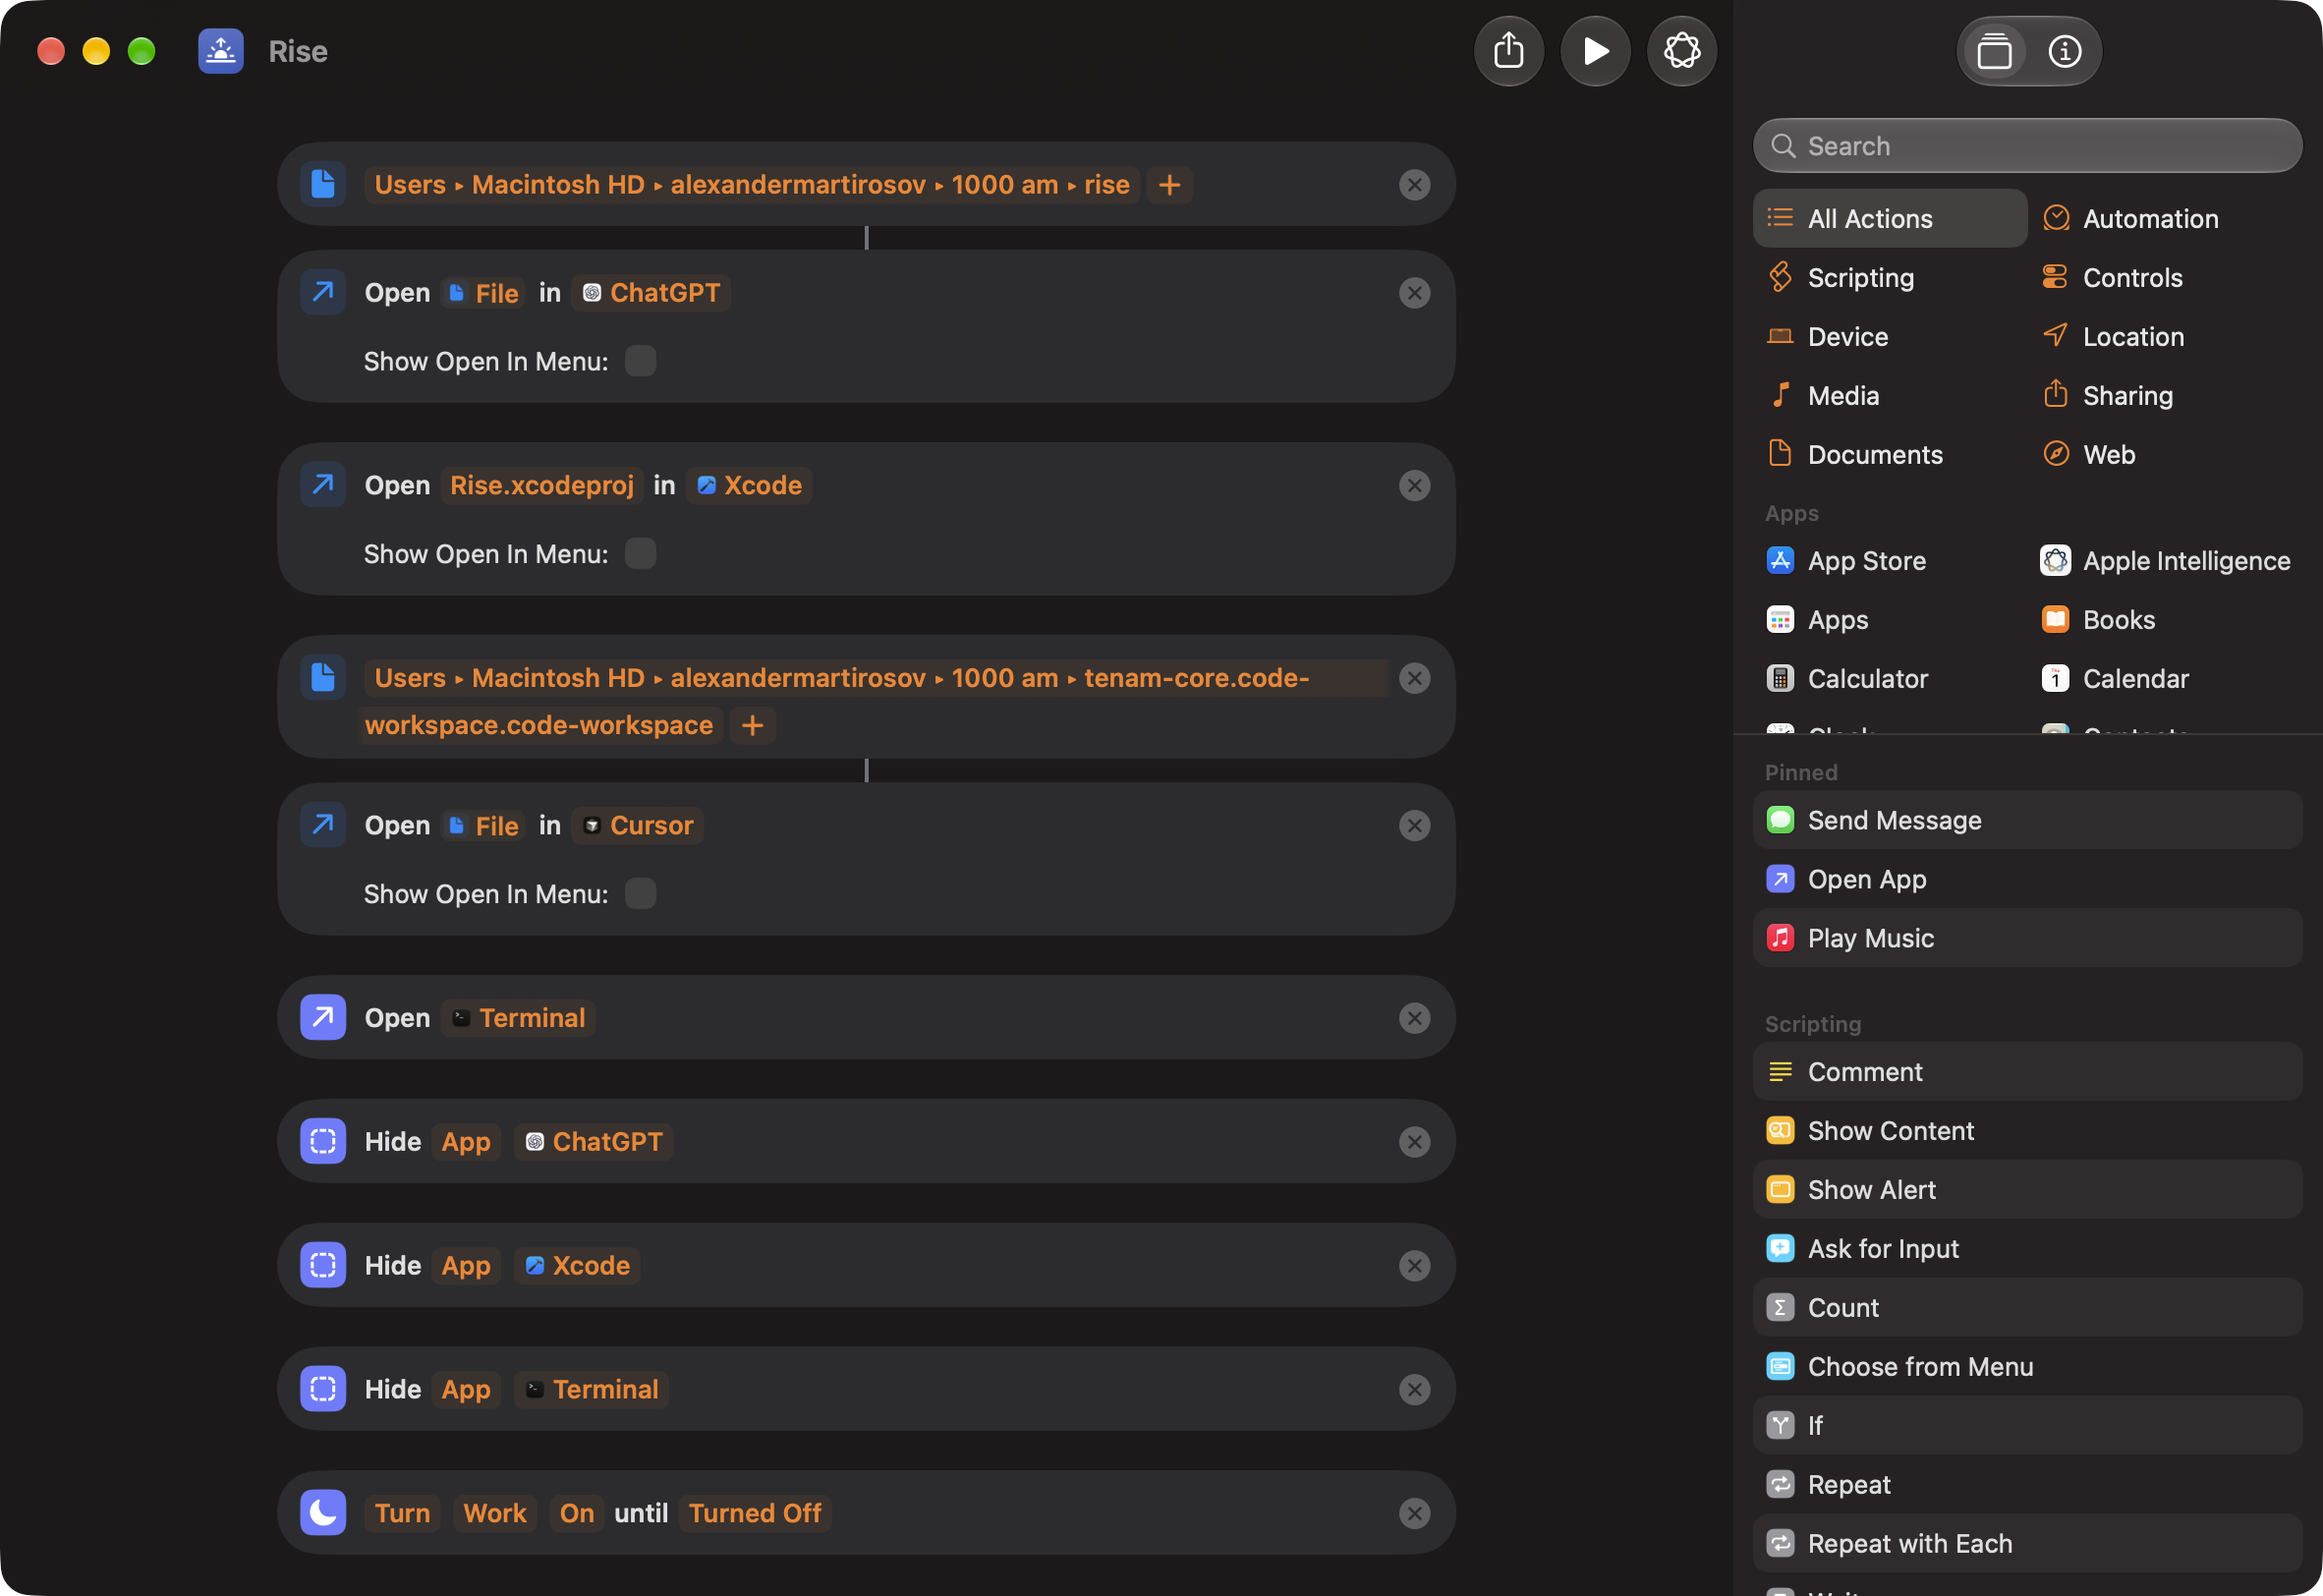
The paths in the screenshot belong to this setup; select your own folders and files in the chooser. Use apps that can open the content you pass them. After a successful run of this example, the projects have been opened, the hidden apps are still running, and Work Focus is on. The shortcut leaves Cursor visible because it has no Hide App action for Cursor.
Make a copy for each project and change its files and apps. A writing version could open a draft and research notes using the same steps. Keep each shortcut specific enough that you know what it will open before you run it.
Use a second shortcut when you finish
Save your documents before running a finish shortcut. The Finish work screenshot shows one Run AppleScript action that asks a list of work apps to quit, followed by Hide App actions for ChatGPT and Safari.
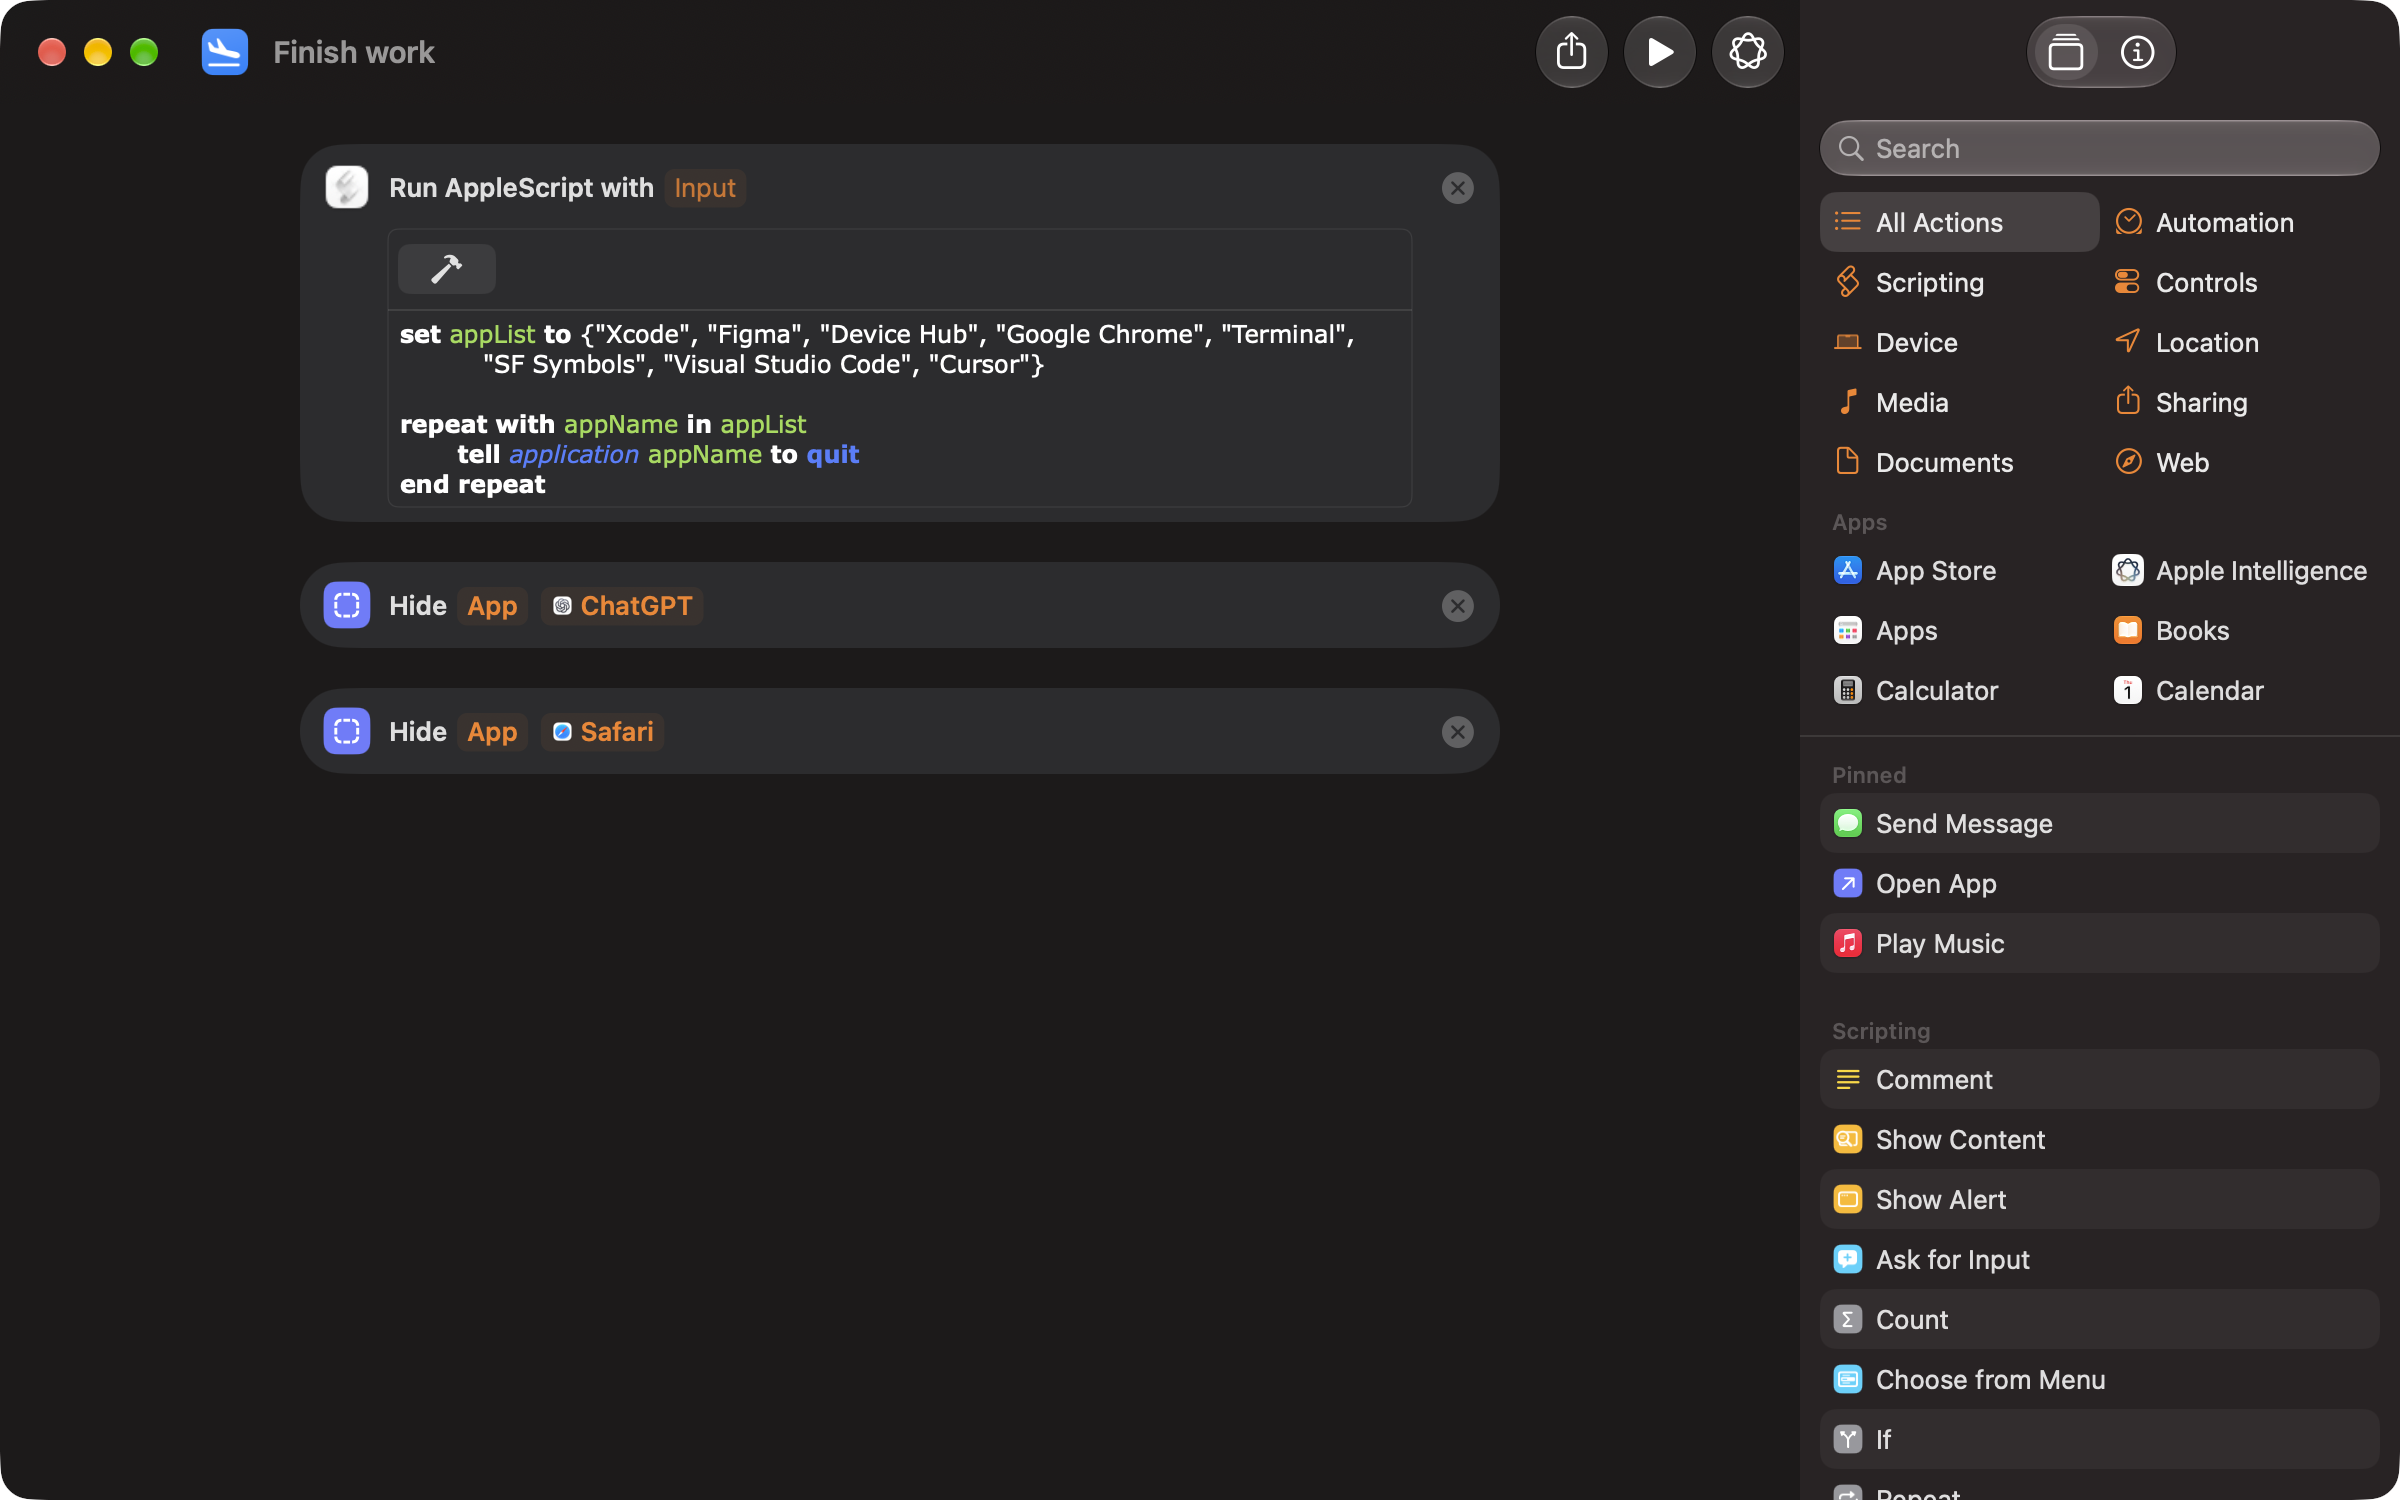
Add Run AppleScript to a new shortcut and replace its sample code with the following. Edit appList to include only apps installed on your Mac, using their names as they appear in Applications.
set appList to {"Xcode", "Figma", "Device Hub", "Google Chrome", "Terminal", "SF Symbols", "Visual Studio Code", "Cursor"}

repeat with appName in appList
    try
        tell application appName to quit
    on error errorMessage
        log "Could not quit " & (contents of appName) & ": " & errorMessage
    end try
end repeat
The loop sends a quit command to each app in order. The try/on error block catches an error from a quit attempt and lets the loop continue. It does not confirm that every app closed. Apple’s AppleScript control statements guide explains this error handling.
After the script, add Hide App for ChatGPT and Safari, or whichever apps you want to leave running. Hiding takes their windows out of view without quitting them. When the script finishes, the shortcut moves on to those actions.
If the shortcut stops or opens the wrong thing
Test from the Shortcuts editor so you can see which action needs attention. These are the first things to check when the setup changes or a run doesn’t finish.
- An app is missing. Install it if you still need it, or choose an installed replacement in Open File, Open App, and Hide App. Remove unused names from the AppleScript list. A replacement app must support the folder or file type you’re passing to it.
- A folder or workspace moved. If File can no longer find it, click its file field and select the item again at its new location. Check that Open File still takes the output of that File action, then rerun the pair. If the app opens the wrong project, check both the selected path and the input token.
- macOS asks for Automation permission. Allow the request for the apps you intend this shortcut to control. If you previously denied it, open System Settings → Privacy & Security → Automation, expand Shortcuts if listed, and enable the target app. If no entry appears yet, run the relevant action again to trigger the request. Apple describes these controls in its Automation permissions guide.
- Run AppleScript is blocked. Open Shortcuts → Settings → Advanced and enable Allow Running Scripts, then rerun the shortcut. This setting is separate from Automation permission. See Apple’s script settings guide.
- An app asks you to save before quitting. Respond to the dialog in that app. A save prompt can hold up the quit request and delay later actions; choosing Cancel can leave the app running. The error handler does not dismiss dialogs or save documents for you. Save first, then run Finish work, and check any app that remains open before switching projects.
Start a focused work block
Once your project is open, you can start a timer and turn on a Focus mode in the same shortcut. Add the Start Timer action and choose a duration that fits the task. Then add the Set Focus action, choose a Focus such as Work, and set it to turn on. Put these after the project-opening actions so your workspace is ready when the block begins.
- Open File
Draft.mdin your writing app - Open App Safari
- Set Focus
Work· Turn On - Start Timer ·
25 minutes
Try the sequence manually once and check what each action does on your Mac. The timer can be a gentle boundary for a single task; it doesn’t need to turn your day into a strict schedule. If your Focus has allowed notifications or people configured, the shortcut uses those settings. At the end of the block, turn Focus off yourself or make a separate end-of-session shortcut. That keeps the finish predictable, especially if the timer is interrupted or you keep working.
Apple’s Clock guide also describes creating shortcuts for timers you use often, then accessing them from the menu bar or with Siri. See Set timers in Clock on Mac.
What else can a shortcut take off your hands?
Extend the same setup when the next step is useful: add a reminder to save before the finish script, or turn Work Focus off at the end. If you switch between writing and coding, Choose from Menu can give each branch its own files, apps, and timer duration. Keep the menu small enough that choosing an option is quicker than finding separate shortcuts.
Give the shortcuts names you can find
Use the same naming pattern for every project: Open — Project Name and Wrap Up — Project Name. Search is then predictable, and you can tell the two workflows apart before running one. You can also add frequently used shortcuts to the Dock or menu bar, depending on the options shown in your version of Shortcuts.
Keep the action list short. Start with the files and apps you repeatedly open by hand, then add a timer or Focus only if it makes the transition easier. Test the shortcut after changing a file path, switching editors, or removing an app. If an action stops matching your workflow, edit or remove it.
A useful shortcut gives a familiar moment a clear beginning or ending: open the project, start the block, and later wrap up. Build around the transitions you already repeat, and let the automation stay simple enough that you trust it.